How to use Spotify’s SDK in Kotlin


On October last year I was on my journey of learning Kotlin when I decided to make an App for my boyfriend, I wanted to combine my interest for Kotlin and music, and at the same time create a nice gift for his birthday. The app was a called MixTape, it was an app with a selection of songs played using Spotify's SDK. It wasn't a complicated app but it was a nice detail and something with the perfect level of complexity for me to continue with my Kotlin learnings.
While I was working on this project I noticed that Spotify published a new SDK for Android and iOS platforms not long ago, their Quick Start Guide is pretty good but all the examples are in Java and as beginner on Kotlin and Android I hit a few walls. I also noticed there's not a lot of information out there to use this new SDK with Kotlin specifically so I decided to create this guide hopping to help anyone else looking to implement this SDK using Kotlin.
In this guide I'm assuming you already created a new project using Android Studio so let's gets started.
Register your app on Spotify ✍️
STEP1: The first step to use Spotify's SDK is to register your app on Spotify for Developers, if you don't have an account please go ahead and create one, you can use your regular Spotify Account to login.
STEP2: Once in the Dashboard, create a new App.
STEP3: In order to associate your Android App with the Spotify App, you will need to provide your app's fingerprint. In this example I will use the debug fingerprint, which you can obtain running the following command in your terminal:
$ keytool -list -v -keystore ~/.android/debug.keystore -alias androiddebugkey -storepass android -keypass android
This will output a list of Certificate fingerprints, copy the one that says SHA1.
To learn more about authorizing Android Apps and getting debug or release fingerprints check this documentation.
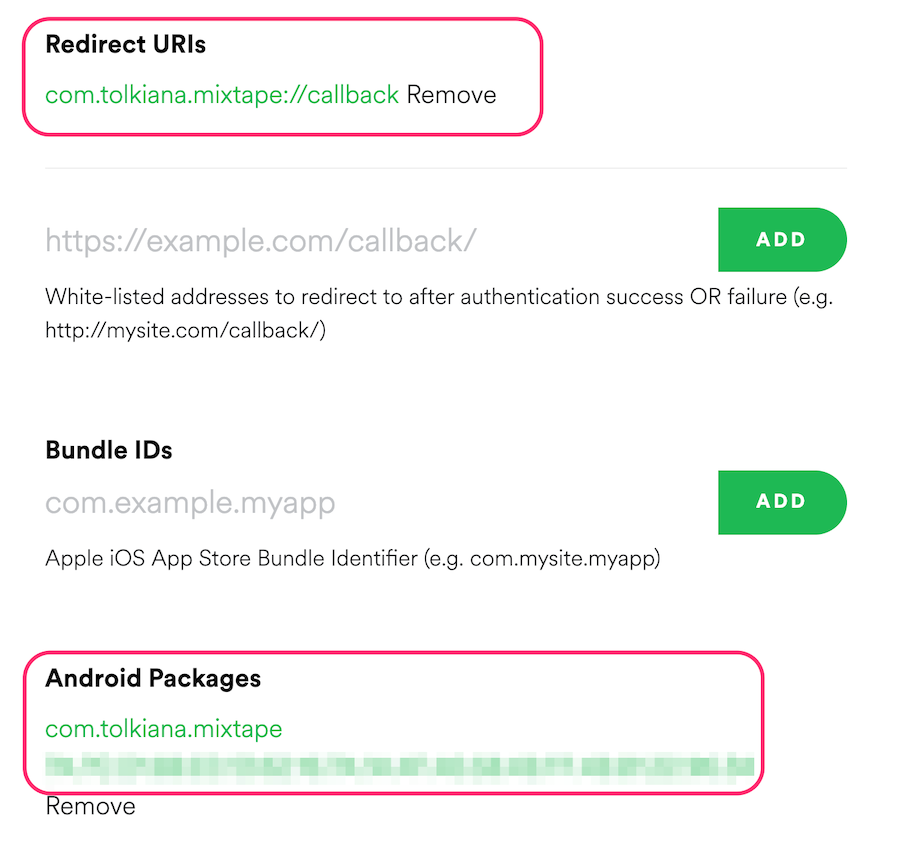
STEP4: Back on your Spotify Dashboard select your app and click on Edit Settings to add a new Android Package. Enter your app's package name and the fingerprint obtained in the previous step.
STEP5: Also make sure to add a redirect URI to use as callback, this could be anything, I use the app's package name.
Add the App Remote SDK 📦
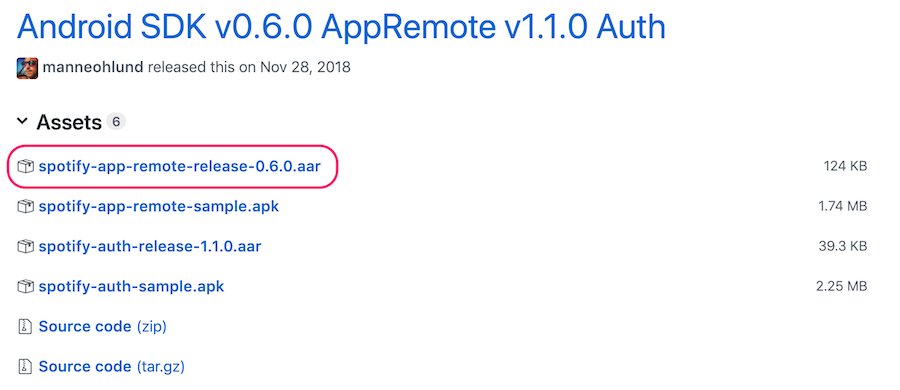
STEP1: Download the Android SDK from Spotify's Github repo, make sure you select the new version, which is the one called AppRemote SDK, the one with the aar extension.
STEP2: Back in your Android Studio project add this Module by following the steps described in the Quick Start Guide to Add the App Remote SDK.
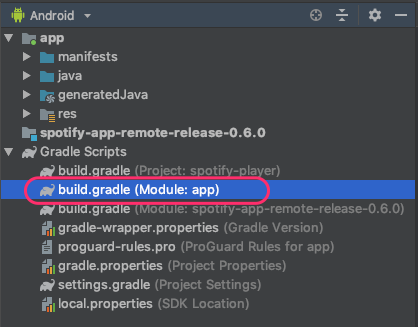
STEP3: Don't forget to add this new module as dependency in your build.gradle file. Notice that the dependency name has to match with the module you just added.
dependencies {
   implementation project(':spotify-app-remote-release-0.6.0')
}
Also make sure to add the GSON (or Jackson) library because Spotify needs it to serialize/deserialize requests.
dependencies {
    implementation project(':spotify-app-remote-release-0.6.0')
    implementation "com.google.code.gson:gson:2.6.1"
}
Note that there are two gradle files, Project and Module, you have to add these dependencies in the Module:app file.
Prepare your device/emulator 📱
In order to use this SDK you will need to install the Spotify App because the SDK uses the app as a Remote Service to do all the heavy work, you can learn more here.
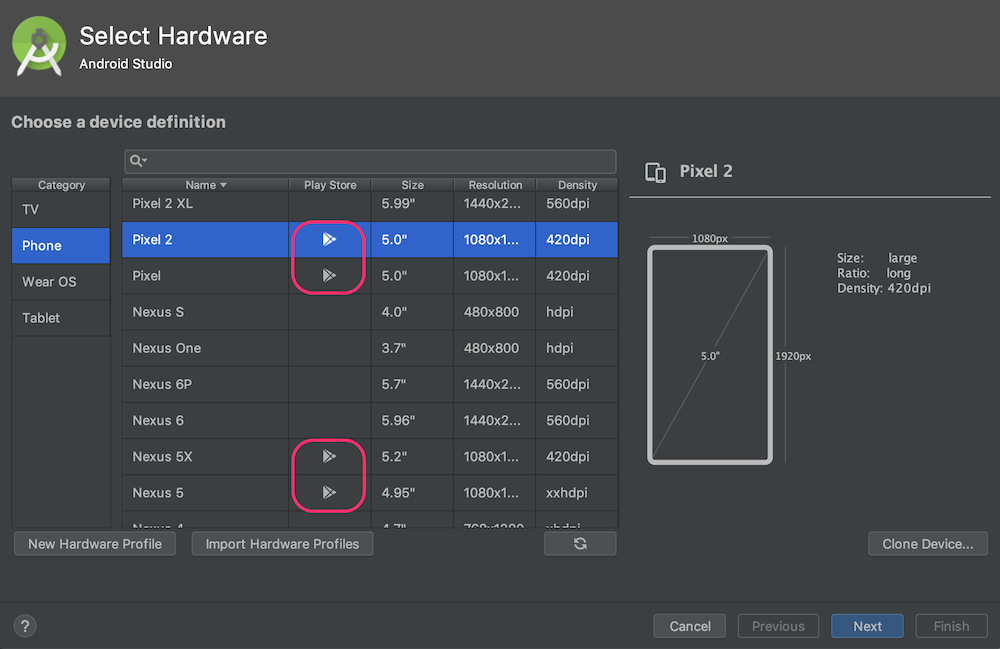
STEP1: If you want to use your emulator, you can install an emulator that contains the Play Store pre-installed so that way you can download the Spotify App.
On the top menu of Android Studio go to Tools -> AVD Manager. In the window that appears next, select Create Virtual Device...
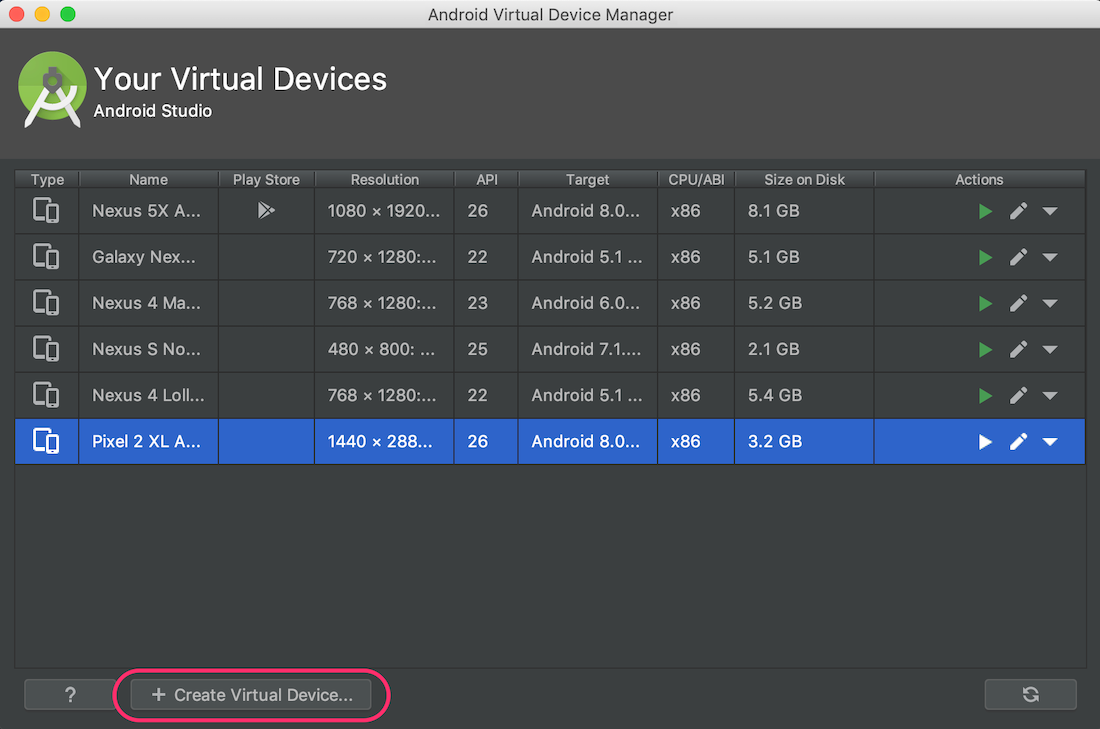
This will present a list of Phones to choose from, select any phone that is marked with the Play Store icon (see image below). In this example I'm selecting Pixel 2.
STEP2: Now you can install the Spotify App through the Play Store and login with any account.
Implement SDK 💃🏻
Now that we have our environment ready, we can start to code!
Setup 🔧
When using any external SDK or Library, I like to wrap the code that interacts with it in a class so I can easily test and consolidate any code that I might need to re-use. In this case, I'm going to create a SpotifyService class and make it a Singleton because I don't need that code to be initialized every single time.
The first thing we will add to this class are Client ID and Redirect URI, you can find both of these things in the app you just created on your Spotify Dashboard.
Also import the Spotify SDK classes shown below that we will need in the next steps.
import com.spotify.android.appremote.api.ConnectionParams
import com.spotify.android.appremote.api.Connector
import com.spotify.android.appremote.api.SpotifyAppRemote

object SpotifyService {
    private const val CLIENT_ID = "YOUR_CLIENT_ID"
    private const val  REDIRECT_URI = "com.tolkiana.spotifyplayer://callback"
}
Connect 🔌
The next step is to create a SpotifyAppRemote object, and create and initialize the connection parameters:
object SpotifyService {
  ...
  private var spotifyAppRemote: SpotifyAppRemote? = null
  private var connectionParams: ConnectionParams = ConnectionParams.Builder(CLIENT_ID)
    .setRedirectUri(REDIRECT_URI)
    .showAuthView(true)
    .build()
}
Now, we can add a function to establish the connection to SpotifyAppRemote.
object SpotifyService {
  ...
  fun connect(context: Context, handler: (connected: Boolean) -> Unit) {
      if (spotifyAppRemote?.isConnected == true) {
        handler(true)
        return
      }
      val connectionListener = object : Connector.ConnectionListener {
        override fun onConnected(spotifyAppRemote: SpotifyAppRemote) {
          this@SpotifyService.spotifyAppRemote = spotifyAppRemote
          handler(true)
        }
        override fun onFailure(throwable: Throwable) {
          Log.e("SpotifyService", throwable.message, throwable)
          handler(false)
        }
      }
      SpotifyAppRemote.connect(context, connectionParams, connectionListener)
  }
}
And with this in place you could call this function from an Activity like this:
class MainActivity : AppCompatActivity() {
  ...
  override fun onCreate(savedInstanceState: Bundle?) {
      super.onCreate(savedInstanceState)
      setContentView(R.layout.activity_main)

      connectButton.setOnClickListener {
        SpotifyService.connect(this) {
          val intent = Intent(this, PlayerActivity::class.java)
          startActivity(intent)
        }
      }
  }
}
Play, Pause, Resume ⏯
From here we can add more functions to our SpotifyService to get the basic functionality of a Player.
enum class PlayingState {
  PAUSED, PLAYING, STOPPED
}

object SpotifyService {
  ...
  fun play(uri: String) {
    spotifyAppRemote?.playerApi?.play(uri)
  }

  fun resume() {
    spotifyAppRemote?.playerApi?.resume()
  }

  fun pause() {
    spotifyAppRemote?.playerApi?.pause()
  }

  fun playingState(handler: (PlayingState) -> Unit) {
    spotifyAppRemote?.playerApi?.playerState?.setResultCallback { result ->
      if (result.track.uri == null) {
        handler(PlayingState.STOPPED)
      } else if (result.isPaused) {
        handler(PlayingState.PAUSED)
      } else {
        handler(PlayingState.PLAYING)
      }
    }
  }
}
And call those functions from our PlayerActivity:
class PlayerActivity : AppCompatActivity() {

  override fun onCreate(savedInstanceState: Bundle?) {
    super.onCreate(savedInstanceState)
    setContentView(R.layout.activity_player)
    setupViews()
    setupListeners()
  }

  private fun setupViews () {
    SpotifyService.playingState {
      when(it) {
        PlayingState.PLAYING -> showPauseButton()
        PlayingState.STOPPED -> showPlayButton()
        PlayingState.PAUSED -> showResumeButton()
      }
    }
  }

  private fun setupListeners() {
    playButton.setOnClickListener {
      SpotifyService.play("spotify:album:5L8VJO457GXReKVVfRhzyM")
      showPauseButton()
    }

    pauseButton.setOnClickListener {
      SpotifyService.pause()
      showResumeButton()
    }

    resumeButton.setOnClickListener {
      SpotifyService.resume()
      showPauseButton()
    }
  }
}
Search❓
You might be wondering but… how do I get the Song/Album URI I want to play?
Typically you might want to implement some sort of search functionality, so the user can tell you what song to play and then you can get the URI via the API, unfortunately this SDK doesn’t support searching or at least not at the moment.
If what you are looking to implement with this SDK doesn’t explicitly require searching, you can manually get songs or albums URI’s through the Spotify App.
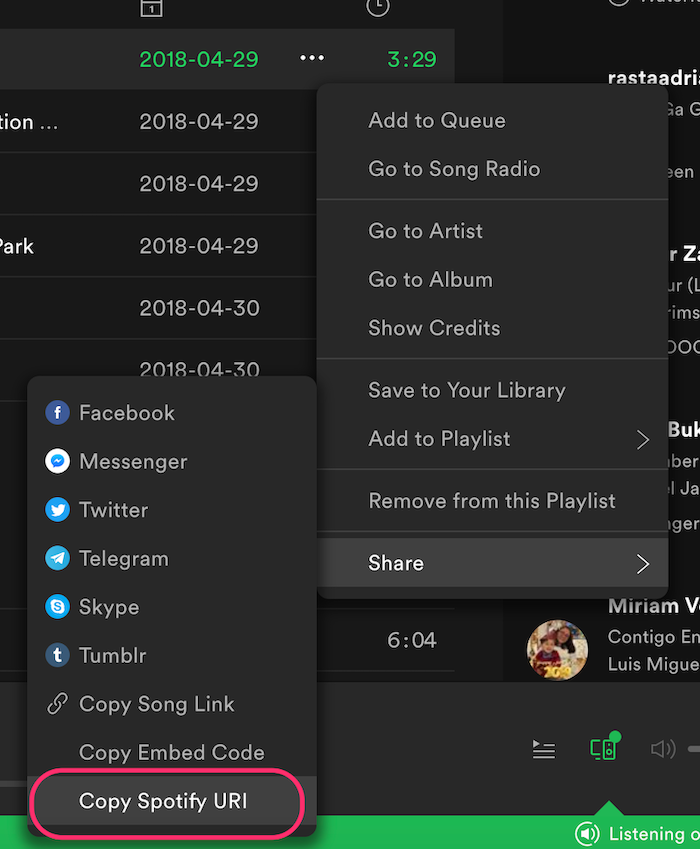
In the example above I’m using a hardcoded URI which I manually got by going to my Spotify MacOS Ap. From the list of songs of any playlist, hover your mouse over the song you want and you should notice three little dots on the right side.

Next, click on the little dots, a menu will appear, select: Share -> Copy Spotify URI, this will copy that Song's URI in your clipboard.
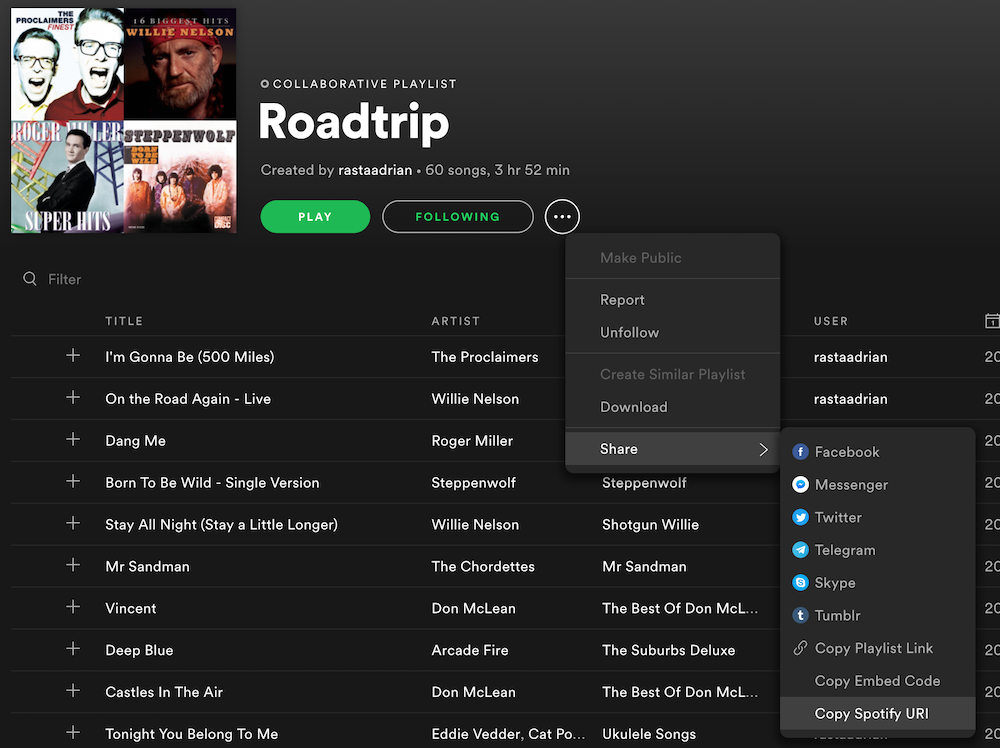
You can do similar thing with albums or playlists:
Getting Track Info 👨🎤
The Spotify Android SDK is composed by other small APIs, for example ImagesApi which combined with the PlayerApi allow you can get the image of the current track playing, like this:
object SpotifyService {
  ...
  fun getCurrentTrack(handler: (track: Track) -> Unit) {
    spotifyAppRemote?.playerApi?.playerState?.setResultCallback { result ->
      handler(result.track)
    }
  }

  fun getImage(imageUri: ImageUri, handler: (Bitmap) -> Unit)  {
    spotifyAppRemote?.imagesApi?.getImage(imageUri)?.setResultCallback {
      handler(it)
    }
  }

  fun getCurrentTrackImage(handler: (Bitmap) -> Unit)  {
    getCurrentTrack {
      getImage(it.imageUri) {
        handler(it)
      }
    }
  }
}
You can even subscribe to any changes happening in the PlayerApi :
object SpotifyService {
  ...
  fun suscribeToChanges(handler: (Track) -> Unit) {
    spotifyAppRemote?.playerApi?.subscribeToPlayerState()?.setEventCallback {
      handler(it.track)
    }
   }
}
So your UI can react accordingly and change the image:
class PlayerActivity : AppCompatActivity() {
  ...
  private fun setupListeners() {
    ...
    SpotifyService.suscribeToChanges {
      SpotifyService.getImage(it.imageUri){
        trackImageView.setImageBitmap(it)
      }
    }
  }
}
Disconnect 🔌
And finally, as indicated in the Quick Start Guide, don't forget to disconnect from the service when no longer needed:
object SpotifyService {
  ...
  fun disconnect() {
    SpotifyAppRemote.disconnect(spotifyAppRemote)
  }
}

class PlayerActivity : AppCompatActivity() {
  override fun onStop() {
    super.onStop()
    SpotifyService.disconnect()
  }
}
Revoke App Access 🧹
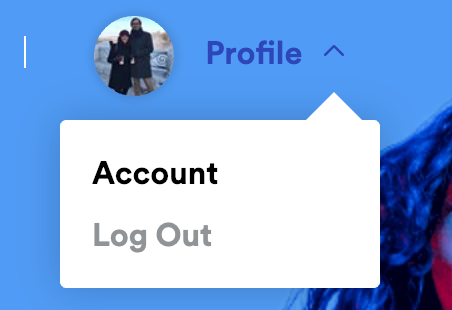
There might be sometimes when you want to test the authorization flow multiple times or you just want to remove this App from your personal Spotify Account, to do that go to the Web Spotify App and then click in Profile -> Account.
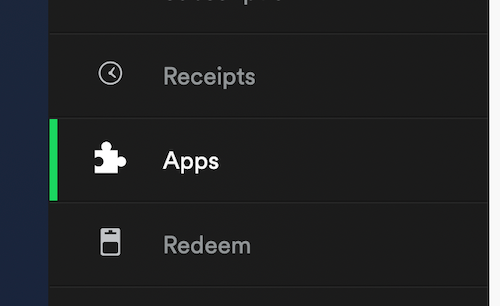
Then in the left menu chose the Apps option:
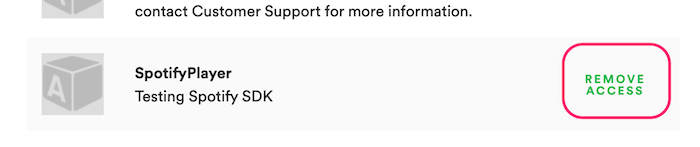
In the list that appears next, search for your App and click the Remove Access button, remember this will cause your App to request Spotify Access once again when you click the Connect button.
Conclusion: Pros and Cons ⚖️
I found that this was an SDK easy to use and setup, unfortunately, one thing that misses, is the possibility to do searching, a very popular feature that could be useful for certain implementations. If you are looking to do something that requires searching, check the Web API.
Overall I liked this SDK mainly because it makes authorization very smooth, you don't have to worry about tokens or worry about a complex setup and this makes things super easy to get started.
I hope to see this API evolving and adding more detail to their documentation.
This was a pretty basic example but I hope it can help you to get started and spark your creativity to implement some fun ideas. You can find the source code for this example here.
Photo by sgcreative on Unsplash