Introduction to Spring Data R2DBC with Kotlin


R2DBC is a specification that provides database connectivity in a non blocking way and Spring Data R2DBC is one of the implementations of this specification. Reactive Connectivity for Relational Databases is still relatively new and, if like me, you are working with Kotlin it can be a little bit challenging to find some examples, that’s the reason why I wanted to write this tutorial to show some of the most common use cases such as custom repositories, batch operations and transactions.
Configuration
Keep in mind that the examples that I will show in this tutorial use Spring Boot version 2.4.2, this is important because you will see examples of the DatabaseClient Interface in other tutorials where they use a version that corresponds to when Spring Data R2DBC was in experimental mode. Since October 2020, DatabaseClient was moved to Spring Core, this is the most recent version and hence using that for this tutorial. You can read more about the differences between org.springframework.data.r2dbc.core.DatabaseClient and org.springframework.r2dbc.core.DatabaseClient here.
Adding dependencies
Besides the correct Spring version other things you will need to define in your Gradle file are:
- Spring Data R2DBC
- The database’s driver you will be using, in my case PostgreSQL
// build.gradle
plugins {
   id("org.springframework.boot") version "2.4.2"
}

dependencies {
    implementation("org.springframework.boot:spring-boot-starter-data-r2dbc")
    runtimeOnly("io.r2dbc:r2dbc-postgresql")
}
Configuring the connection
Specify the URL and credentials of your database in your application file as shown below, these properties will be used to create a default ConnectionFactory (you can create and customize your own by adding a new bean in any configuration class).
#application.yml
spring:
  r2dbc:
    url: r2dbc:postgresql://localhost/postgres
    username: postgres
    password: strongPassword
Custom Repositories
Performing CRUD operations for single tables it’s relatively easy. A simple implementation can be achieved by using the default functions defined in ReactiveCrudRepository Interface.
Consider a colors table, if you wanted to get all the colors from that table your code would look like this:
@Table("colors")
data class Color(
    @Id val id: Int?,
    val code: String,
    val name: String
)

interface ColorRepository: ReactiveCrudRepository<Color, Int>

fun getAllColors(): Flux<Color> {
    return colorRepository.findAll()
}
However if you want to perform more complex operations like getting data from joined tables you might want to use DatabaseClient instead so you can have more control over your queries and mapping the data to the correct classes.
One way to add custom functions to your repository is via composition. In the example below I’m creating a new interface where I can define any functions I want to describe my custom behavior.
interface ColorRepository: ReactiveCrudRepository<Color, Int>, CustomColorRepository {}

interface CustomColorRepository {
    fun findByProduct(productId: Int): Flux<Color>
}
Continue to the next section to see how the implementation for this custom function looks like.
Read
Continuing with the colors table example from earlier. Consider the following relation with a products table.
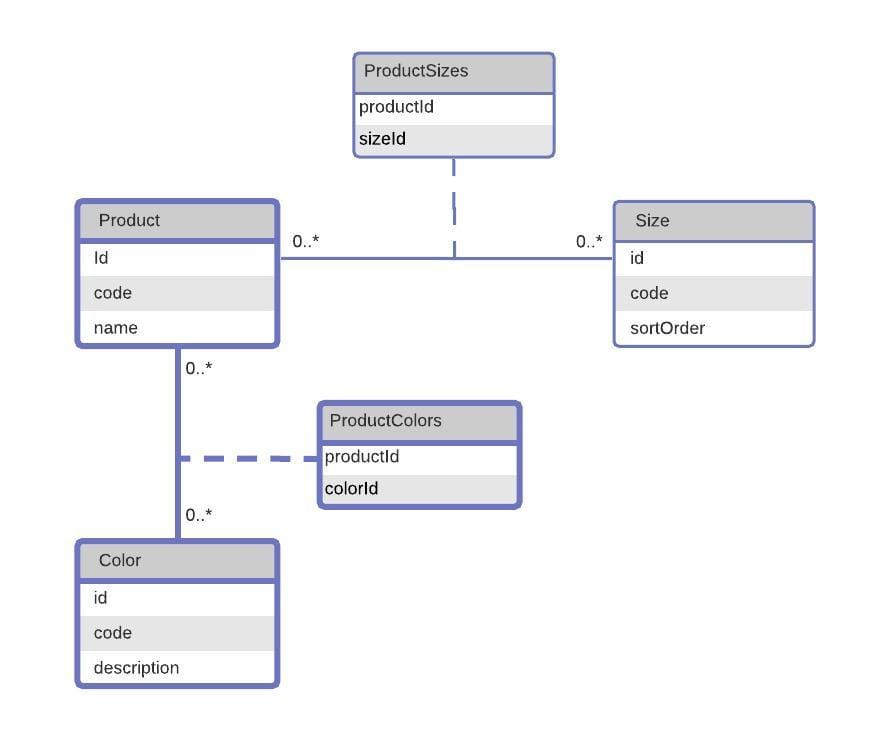
Now imagine that you want to get all the colors (including code and name) given a productId. The code snippet below shows a query to do that and how to execute it by using the sql function from DatabaseClient. You can also bind parameters to the query by using the bind function and passing the parameter name used in the query.
Notice this is the implementation of the custom interface CustomColorRepository that was declared above.
const val selectColorsByProduct = """
    SELECT co.id as color_id, co.code as color_code, co.name as color_name
    FROM colors as co
    INNER JOIN product_colors pc on co.id = pc.color_id
    WHERE product_id = :productId
"""

// Custom Repository implementations need to end with "Impl"
// You can configure this suffix by overriding the default value
// of repositoryImplementationPostfix from EnableR2dbcRepositories
class CustomColorRepositoryImpl(
    private val databaseClient: DatabaseClient,
    private val mapper: ColorMapper
): CustomColorRepository {
    override fun findByProduct(productId: Int): Flux<Color> {
        return databaseClient.sql(selectColorsByProduct)
            .bind("productId", productId)
            .map(mapper::apply)
            .all()
    }
}
Mapping
You might have noticed that we are also mapping the results of the query using the map function. When using DatabaseClient we always want to do this otherwise it doesn’t know how to map your results to the corresponding object. The code below shows what that mapper looks like.
@Component
class ColorMapper: BiFunction<Row, Any, Color> {
    override fun apply(row: Row, o: Any): Color {
       return Color(
           row.get("color_id", Number::class.java)?.toInt(),
           row.get("color_code", String::class.java) ?: "",
           row.get("color_name", String::class.java) ?: ""
       )
   }
}
Insert
Inserting, updating and deleting data into the database can be easily accomplished if you use the default functions from ReactiveCrudRepository, however, you can also use DatabaseClient to perform these operations. The following sections show an example for each one of these operations by using the sql function to execute the statements and the bind function to add any required parameters.
const val insertProduct = """
   INSERT INTO products (code, description) VALUES (:code, :description)
"""
class CustomProductRepositoryImpl(
   private val databaseClient: DatabaseClient,
   private val mapper: ProductMapper
): CustomProductRepository {

   override fun save(product: Product): Mono<Product> {
       return databaseClient.sql(insertProduct)
           .filter { statement, _ -> statement.returnGeneratedValues("id").execute() }
           .bind("code", product.code)
           .bind("description", product.description)
           .fetch()
           .first()
           .map { product.copy(id = it["id"] as Int) }
   }
}
Update
const val updateProduct = """
   UPDATE products SET code = :code, description = :description
   WHERE id = :productId
"""
class CustomProductRepositoryImpl(
   private val databaseClient: DatabaseClient,
   private val mapper: ProductMapper
): CustomProductRepository {

    override fun update(product: Product): Mono<Int> {
       return databaseClient.sql(updateProduct)
           .bind("code", product.code)
           .bind("description", product.description)
           .bind("productId", product.id)
           .fetch().rowsUpdated()
    }
}
Delete
const val deleteAllProductColors = """
   DELETE FROM product_colors WHERE product_id = :productId
"""
class CustomProductRepositoryImpl(
   private val databaseClient: DatabaseClient,
   private val mapper: ProductMapper
): CustomProductRepository {

    override fun deleteAllProductColors(productId: Int): Mono<Int> {
        return databaseClient
           .sql(deleteAllProductColors)
           .bind("productId", productId)
           .fetch().rowsUpdated()
   }
}
Batch Operations
Batch operations are another good use case for DatabaseClient. Imagine that you want to associate a product with multiple colors, this means that you would need to add multiple entries to the product_colors table. This can be accomplished by using the inConnectionMany function, creating a connection statement and binding the values using a for loop.
const val insertProductColor = """
   INSERT INTO product_colors (product_id, color_id) VALUES ($1, $2)
"""
class CustomProductRepositoryImpl(
   private val databaseClient: DatabaseClient,
   private val mapper: ProductMapper
): CustomProductRepository {

   override fun insertProductColors(productId: Int, colorIds: List<Int>):
   Flux<Number> {
      return databaseClient.inConnectionMany { connection ->
         val statement = connection.createStatement(insertProductColor)
         colorIds.forEach {
            statement.bind(0, productId).bind(1, it).add()
         }
         statement.execute().toFlux().flatMap { result ->
             result.map { row, _ -> row.get("color_id", Int::class.java) }
         }
      }
   }
}
Transactions
Finally, another common feature needed when working with relational databases is having the ability to rollback changes if any of them fail when getting executed in a chain.
Consider the example of a Product. When creating a product, we want to add the product to the products table and also associate colors and sizes by adding entries to the product_colors and product_sizes tables respectively. In order to do this, first, we need to enable transaction management and create a ReactiveTransactionManager as shown in the snippet below.
@Configuration
@EnableTransactionManagement
class DatabaseConfiguration {

   @Bean
   fun transactionManager(connectionFactory: ConnectionFactory):
   ReactiveTransactionManager {
      return R2dbcTransactionManager(connectionFactory)
   }
}
The last step is to add a @Transactional annotation wherever you have a function that is chaining multiple repository calls. In the example below, If any of the productRepository functions were to fail, none of the changes will be applied to the database.
@Transactional
fun createProduct(product: Product): Mono<Product> {
   val colorIds = product.colors.map { it.id }
   val sizeIds = product.sizes.map { it.id }
   return productRepository
      .save(product)
      .flatMap { productRepository.insertProductColors(it.id, colorIds) }
      .flatMap { productRepository.insertProductSizes(it.id, sizeIds) }
}
Conclusion
That's it! I hope you find these examples useful, you can find the full code example on my GitHub repository. Happy Coding! 👋
Photo by Denis Pavlovic on Unsplash