To The Core of Core NFC
Core NFC is an Apple framework that allows developers to interact with the iPhone’s internal NFC device. In this article we will talk about how to use it to read and write NFC tags.

Core NFC is an Apple framework that allows developers to interact with the iPhone’s internal NFC device. In this article we will talk about how to use it to read and write NFC tags.
However, because NFC is such a large topic, I want to expand a little on the main characteristics of the NFC technology itself first and then dive into Core NFC. You can skip the first part if you are already familiar with NFC or if you just want to go straight to the code.
PART I
Some of the features described in this section are not necessarily supported on iPhones yet but hopefully, this will give you an idea of the range of possibilities and potential of the technology, it will also be useful to better identify the things that you can or cannot do with Core NFC.
Why NFC?
Near Field Communication is a wireless technology that employs radio signals and is part of the RFID family.
Having so many other wireless technologies one might wonder what makes NFC different from its cousin RFID or Bluetooth. Let’s see some examples:
- It requires little power consumption. NFC requires much less power consumption than Bluetooth and user experience is much simpler because it doesn’t require setup or pair devices, making it much faster and easier to send data.
- Short-range communication. Both NFC and RFID employ radio signals but the main difference between these two is the communication range. RFID has a larger range and it can be used at a distance of several feet whereas NFC range is of about 4 inches or less and this close range it’s what makes it ideal for secure communication, making payments a common use case of this characteristic.
- It can be set up for one way or two-way communication. NFC devices are able to act as a tag reader or as a tag itself and are able to switch between these two modes, this feature is also known as peer-to-peer communication.
Contactless payments, such as Apple Pay, is one of the most common applications, but NFC has a wide range of many other applications as well as fields where it can be applied; for example in public transportation for smart ticketing, at home for smart control, keyless access, on manufacturing to identify products and others. Many of these applications haven’t been explored on iOS because Core NFC has been pretty limited, but recently Apple announced tag writing which luckily opens the door to implement more interesting things with this technology.
Types of NFC Devices
- Passive devices have no power source, NFC tags are the most common of these devices, and they can only connect to Active devices.
- Active devices have a power source. They can send and receive data by switching between the normal active state and passive state. iPhones have this type of NFC device.
NFC Modes
Knowing the different modes in which an NFC device can operate is a helpful way to discern which features are available for developers on Core NFC and which aren’t, because although some models of iPhones might contain the hardware that support these modes, it does not mean that Core NFC offers an API to work with them.
- Tag Reader/Writer. Allows an NFC active device to read and/or write passive NFC tags and stickers. This is the only mode available for developers on Core NFC for now.
- Peer to Peer. Allows active NFC devices to exchange information by switching between passive and active states. Although the hardware on iPhone 7 and later supports this mode, Apple hasn’t opened an API for developers so Core NFC does not support this mode at the moment.
- Card Emulation. Allows an active NFC device itself to act as a smart card, allowing users to perform transactions such as payment or ticketing. This is the mode in which your phone operates when using Apple Pay, however, same as the previous mode, APIs are not open for developers and Core NFC does not support this mode.
Understanding NFC Tags
Given that the only mode we can use on Core NFC is Tag Reader/Writer, it is important to understand the different types of tags and how to use them.
NFC tags may differ in their command sets, memory layout and even their underlying technology, each type has specific functionality that lets you use the tag for particular tasks, so a good way to understand these types is by their applications. The following table shows how each type relates to the protocols available in Core NFC and some of the main characteristics of each type.
| Type | Applications | Other Characteristics | What Core NFC Protocols to use? | Underlying technology |
|---|---|---|---|---|
| 1 | - Read Only Applications - Store small amounts of data such as a website URL |
- Slow and Cheap | NFCNDEFTag | ISO14443A |
| 2 | - Event tickets - Badging systems |
- The most popular type - Faster than Type 1 |
NFCNDEFTag NFCMiFareTag |
ISO14443A |
| 3 | - Transit tickets - Payments - Electronic IDs - Health care devices - Home electronics |
- Used primarily in Japan - It's more expensive |
NFCNDEFTag NFCFeliCaTag |
ISO18092 |
| 4 | - Passports - Payments |
- Its most important feature is security - Moderate to high price tag |
NFCNDEFTag NFCISO7816Tag NFCMiFareTag |
ISO14443A, ISO14443B |
| 5 | - Retail - Industrial applications - Health care |
- Also called Vicinity Tags - Back-end database support |
NFCNDEFTag NFCISO15693Tag |
ISO15693 |
One thing that you will notice in the table above is that for all types of tags you can use the NFCNDEFTag protocol, back in the beginning, when Apple released Core NFC, they used to only support NDEF formatted tags, which meant that you could read any tag regardless of their underlying technology. However, this also meant that the kind of things that you could do with these tags was fairly limited. For example, you couldn't take advantage of the security features that some types offer. With the latest updates to Core NFC now you can do Native tag reading and writing, which allows access to the more advanced and specific features of each type.
NFC Data Exchange Format
Thinking on the table from the previous section, each type of tag has different underlying technologies. You can see each one of those standards as the different languages that each type speaks. NDEF is the standardized method that helps NFC devices communicate with any type of tag, regardless of that native language.
You can think about NDEF as an abstraction layer that provides you some standard tag features exposed through this format. More formally, NDEF is defined as following:
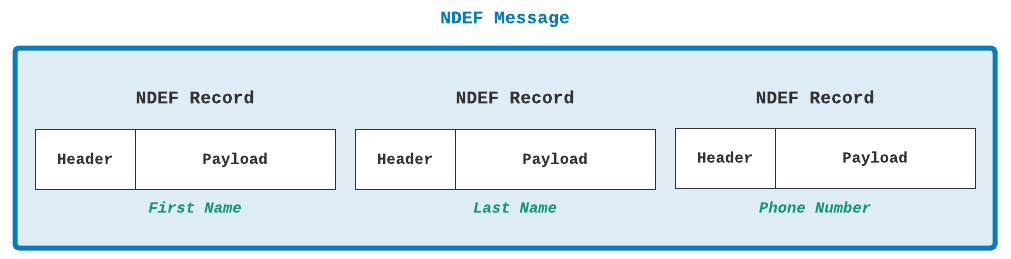
NDEF is a binary format structured in messages, each of which can contain several records, each record is made up of a header, which contains metadata about the record, such as the record type, length, and so forth, and the payload is the part that contains the actual information of that message.¹
In Core NFC a NDEF Message is represented with the NFCNDEFMessage Class . You can create one object of this class by passing an array of records:
init(records: [NFCNDEFPayload]);
You can create records using the NFCNDEFPayload class. Similarly, you can initialize a record with the following initializer:
init(format: NFCTypeNameFormat,
     type: Data,
     identifier: Data,
     payload: Data)
Here's what each parameters means:
format: A record’s header is composed of multiple flags and the Type Name Format (TNF).This is one of the most important pieces of information because it describes the record type and sets the expectation for the structure and content of the record. In Core NFC, the TNF is represented by the NFCTypeNameFormat Enum which has seven possible values:
typedef NS_ENUM(uint8_t, NFCTypeNameFormat) {
    NFCTypeNameFormatEmpty             = 0x00,
    NFCTypeNameFormatNFCWellKnown      = 0x01,
    NFCTypeNameFormatMedia             = 0x02,
    NFCTypeNameFormatAbsoluteURI       = 0x03,
    NFCTypeNameFormatNFCExternal       = 0x04,
    NFCTypeNameFormatUnknown           = 0x05,
    NFCTypeNameFormatUnchanged         = 0x06
};
type: This parameter refers only to the type of the payload (not the entire record). For instance, a record can be MIME Format ( NFCTypeNameFormatMedia ) but we still need to know the specific type of the Payload: Text, Image, Audio, etc. Because MIME is such a common format instead of using the initializer Core NFC provides two static functions to make easier creating NDEF records:
class func wellKnownTypeURIPayload(url: URL) -> Self?
// This function creates a record of MIME format with payload of type URL.
class func wellKnownTypeTextPayload(string text: String,
                                    locale: Locale) -> Self?
// This function creates a record of MIME format with payload of type Text.
identifier: Is the Unique identifier of the record.
payload: Is the actual content of the record for example, the User’s name or a website URL, image, etc.
PART II
Preparing your environment
In order to work with Core NFC it is necessary to configure and prepare your Xcode project to make sure it works correctly.
1. Add Entitlements. If you are working with only NDEF Formatted tags you just need to add the NFC Data Exchange Format entitlement. If you are also working with the native features, add the NFC tag-specific data protocol entitlement. The entitlements file should go in the root of your project. Name the file with the same name of your Project.
<!--NFCMusic.entitlements-->
<?xml version="1.0" encoding="UTF-8"?>
<!DOCTYPE plist PUBLIC "-//Apple//DTD PLIST 1.0//EN" "http://www.apple.com/DTDs/PropertyList-1.0.dtd">
<plist version="1.0">
<dict>
	<key>com.apple.developer.nfc.readersession.formats</key>
	<array>
		<string>NDEF</string>
		<string>TAG</string>
	</array>
</dict>
</plist>
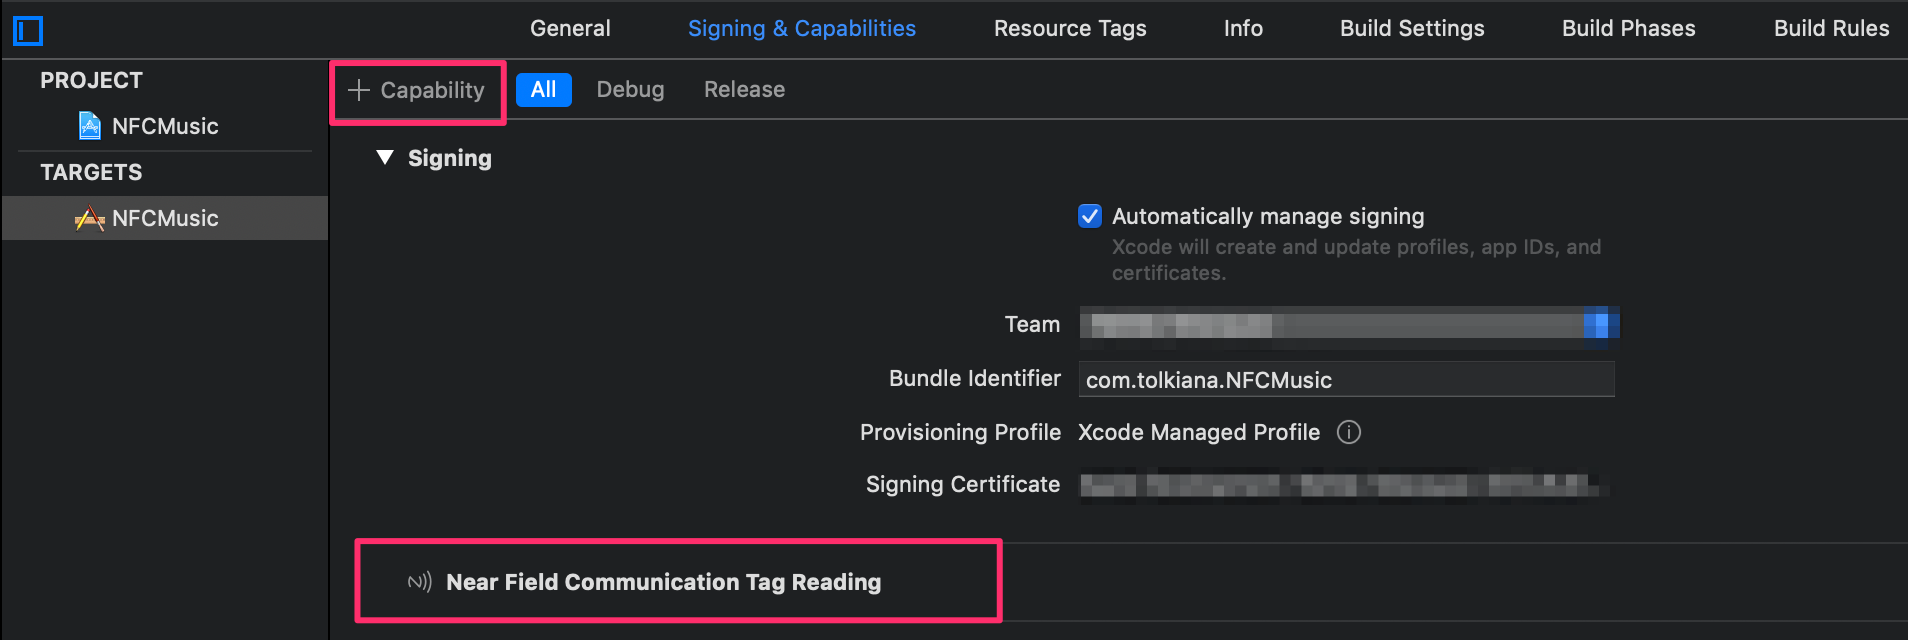
2. Add the NFC Capability in your target settings.
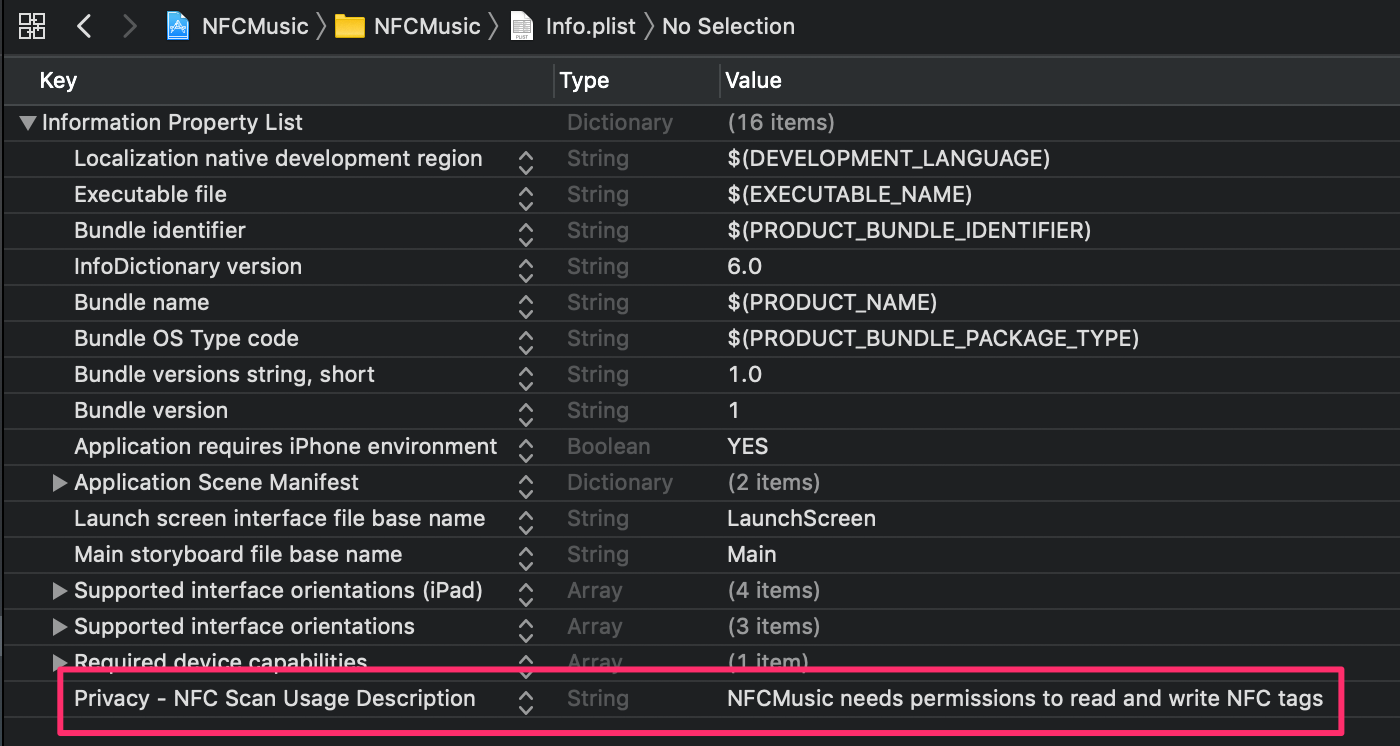
3. Add a Usage Description, otherwise the app will crash when trying to scan a tag.
Writing NDEF Tags
Tags might or might not be NDEF formatted which means that if a tag is not NDEF formatted we would need to access the tag through one of the Native Core NFC Protocols mentioned in the Understanding NFC Tags section. For this example we will use a NDEF formatted tag so we can just use the NFCNDEFTag Protocol.
In this example we want to write information about a song so we can play it later on Spotify. These are the three components we want to store in the tag:
URI: spotify:track:33jt3kYWjQzqn3xyYQ5ZEh
Song Name: Cheek to Cheek
Artist: Ella Fitzgerald
So now that we know what we want to write, let’s get started and go step by step.
1. Encode Message ✉️
For this part we are going to create a class called NFCMessageEncoder that will help us encapsulate all the logic to create a NFC Message, this class contains a method that creates an array of payloads given a set of URLs and another with a set of Strings at the end. It combines the two arrays and creates a NFCNDEFMessage with them.
class NFCMessageEncoder {

    func message(with urls: [URL], and texts: [String]) -> NFCNDEFMessage? {
        let payloads = self.payloads(from: texts) + self.payloads(from: urls)
        return (payloads.count > 0) ? NFCNDEFMessage(records: payloads) : nil
    }

    // MARK: - Private

    private func payloads(from texts: [String]) -> [NFCNDEFPayload] {
        return texts.compactMap { text in
            return NFCNDEFPayload.wellKnownTypeTextPayload(
                string: text,
                locale: Locale(identifier: "En")
            )
        }
    }

    private func payloads(from urls: [URL]) -> [NFCNDEFPayload] {
        return urls.compactMap { url in
            return NFCNDEFPayload.wellKnownTypeURIPayload(url: url)
        }
    }
}
2. Begin the Session 🎬
Now that we have a way to create messages, let's see how to create the session that ultimately will allow us to write the message in the tag. For that we are going to create another class called NFCWriter that implements NFCNDEFReaderSessionDelegate.
This class contains a public function that helps to initialize the message we want to write and to begin the NFC session. Beginning the session is what ultimately allows the tag to be detected when we approach it to our iPhone. We will use this function later in our ViewController to start the whole process of writing the tag.
class NFCWriter: NSObject, NFCNDEFReaderSessionDelegate {
    private var session: NFCNDEFReaderSession? = nil
    private var message: NFCNDEFMessage? = nil

    func startSession(with message: NFCNDEFMessage) {
        self.message = message
        session = NFCNDEFReaderSession(delegate: self,
                                       queue: nil,
                                       invalidateAfterFirstRead: true)
        session?.begin()
    }
}
3. Detect the Tag 🔎
Still in the NFCWriter class, we want to implement the readerSession(_:didDetectNDEFs:) method from NFCNDEFReaderSessionDelegate to detect the tag and connect to it.
This method can detect multiple tags but for this example we are only using one, so we only need to get the first one from the array. We also need to make sure we have a valid message (passed using the startSession function in the previous step). Finally, we need to connect to the tag and if the connection succeeds, call our private function to write the message on the tag (we will see in the next steps in what consists the write function).
Because this method is only available on iOS 13 and above, let’s not forget to add an annotation to make sure it’s safe to use it.
class NFCWriter: NSObject, NFCNDEFReaderSessionDelegate {

    @available(iOS 13.0, *)
    func readerSession(_ session: NFCNDEFReaderSession,
                         didDetect tags: [NFCNDEFTag]) {
        guard let tag = tags.first else {
            session.invalidate(errorMessage: "Couldn't read tag")
            return
        }
        guard let message = self.message else {
            session.invalidate(errorMessage: "Invalid Message")
            return
        }

        session.connect(to: tag) { (error: Error?) in
            if error != nil {
                session.invalidate(errorMessage: "Connection error. Please try again.")
                return
            }
            self.write(message, to: tag)
        }
    }
}
4. Write your Tag 📝
The final step is to actually write the message on the tag and for that we’ll need to call the queryNDEFStatus method to know if we are allowed to write the tag and if we are. Then we can call the writeNDEF method and pass the message.
class NFCWriter: NSObject, NFCNDEFReaderSessionDelegate {
    @available(iOS 13.0, *)
    private func write(_ message: NFCNDEFMessage, to tag: NFCNDEFTag) {
        tag.queryNDEFStatus() { (status: NFCNDEFStatus, _, error: Error?) in
            guard status == .readWrite else {
                self.session?.invalidate(errorMessage: "Can’t write on tag.")
                return
            }

            tag.writeNDEF(message) { (error: Error?) in
                if (error != nil) {
                    self.session?.invalidate(errorMessage: error?.localizedDescription ?? "There was an error")
                }
                self.session?.alertMessage = "Message successfully saved"
                self.session?.invalidate()
            }
        }
    }
}
Now that our NFCWriter class is complete we are ready to use it in our ViewController where we can trigger the whole process using a button. First we create each component and then we create the NFCNDEFMessage using our NFCMessaggeEncoder class. Finally we call the NFCWriter to pass the message and start the writing session.
class ViewController: UIViewController {

    private let encoder = NFCMessageEncoder()
    private let writer = NFCWriter()

    @IBAction func write(_ sender: UIButton) {
        let songName = "Check to Check"
        let artist = "Ella Fitzgerald"
        guard let url = URL(string: "spotify:track:33jt3kYWjQzqn3xyYQ5ZEh") else {
            return
        }
        guard let message = encoder.message(with: [url], and: [songName, artist]) else {
            return
        }
        writer.startSession(with: message)
    }
}
Reading NDEF Tags
1. Begin the Session 🎬
Similar to when we were writing a tag, for reading we also create a class (NFCReader) that implements NFCNDEFReaderSessionDelegate and contains a function that, unlike NFCWrite, allows to initialize a callback that will get called when the message is read successfully. As the name indicates this function also allows to begin the NFC session that we will use it later in our ViewController to start the whole process of reading the tag.
class NFCReader: NSObject, NFCNDEFReaderSessionDelegate {
    private var session: NFCNDEFReaderSession? = nil
    private var message: NFCNDEFMessage? = nil
    private var successReading: ((NFCNDEFMessage) -> ())?

    func startSession(succes: ((NFCNDEFMessage) -> ())?) {
        successReading = succes
        session = NFCNDEFReaderSession(delegate: self,
                                       queue: nil,
                                       invalidateAfterFirstRead: true)
        session?.begin()
    }
}
2. Detect the Tag 🔎
This is very similar to the writing example we need to implement readerSession(_:didDetectNDEFs:) method from NFCNDEFReaderSessionDelegate to detect the tag and connect to it. The only difference in this case will be that instead of calling a function to write, we will call a private function to read the tag.
class NFCReader: NSObject, NFCNDEFReaderSessionDelegate {
    @available(iOS 13.0, *)
    func readerSession(_ session: NFCNDEFReaderSession, didDetect tags: [NFCNDEFTag]) {
        guard let tag = tags.first else {
            session.invalidate(errorMessage: "Couldn't read tag")
            return
        }
        session.connect(to: tag) { (error: Error?) in
            if error != nil {
                session.invalidate(errorMessage: "Connection error. Please try again.")
                return
            }
            self.read(tag)
        }
    }
}
3. Read the Tag 📖
Our read function will call the readNDEF method of NFCNDEFTag and if successful, it will call the successReading callback that we initialized in the first step.
class NFCReader: NSObject, NFCNDEFReaderSessionDelegate {
   private func read(_ tag: NFCNDEFTag) {
        tag.readNDEF { (message: NFCNDEFMessage?, error: Error?) in
            guard error == nil else {
                self.session?.invalidate(errorMessage: error!.localizedDescription)
                return
            }
            guard let message = message else {
                self.session?.invalidate(errorMessage: "There's no message")
                return
            }
            self.successReading?(message)
            self.session?.alertMessage = "Message successfully read"
            self.session?.invalidate()
        }
    }
}
4. Decode your Message 👀
Finally, now that NFCReader is complete we can call it in our ViewController.We’ll use a button to start the session and do something when the callback with the read message gets triggered.
class ViewController: UIViewController {

    private let decoder = NFCMessageDecoder()
    private let reader = NFCReader()

    @IBAction func read(_ sender: UIButton) {
        reader.startSession { message in
            let song = self.decoder.decode(message)
            print(song) // Returns an array of Strings containing the title, artist and URI of the song.
        }
    }
}
You will notice that the message in the callback is returned as an object of the NFCNDEFMessage class. This message is not decoded and we can not see what’s actually on it yet. For that we need to call the NFCMessageDecoder class to loop through the records on the message and convert them to Strings or URIs (which are the types we are interested in this case. If you were to try to read other types of message you would need to modify your decoder accordingly). In the snippet below we show exactly what the decoder does.
class NFCMessageDecoder {

   func decode(_ message: NFCNDEFMessage) -> [String] {
       return message.records.compactMap { payload in
           return self.decode(payload)
       }
   }

   private func decode(_ payload: NFCNDEFPayload) -> String? {
       let type = PayloadType(rawValue: payload.type.decode())
       switch type {
       case .uri:
           return payload.wellKnownTypeURIPayload()?.absoluteString
       case .text:
           return payload.wellKnownTypeTextPayload().0
       default:
           return nil
       }
   }
}
From the first part of this post you might remember that NFCNDEFPayload objects have a property type that refers to the type of payload, whether if it is Text, URI, etc. In the private function above (line number 10) we are getting the payload type and decoding it using the following extension to get its String value.
extension Data {
    func decode() -> String {
        guard let value = String(data: self, encoding: .utf8) else {
            return ""
        }
        return value
    }
}
In this case the possible values can be the letter T for payloads of type Text or the letter U for payloads of type URI, knowing this we can create the enum below to easily switch and convert the payloads to either String or URI (lines number 13 and 15 respectively in the NFCMessageDecoder class).
enum PayloadType: String {
    case text = "T"
    case uri = "U"
    case unkown

    init(rawValue: String) {
        switch rawValue {
        case "U": self = .uri
        case "T": self = .text
        default: self = .unkown
        }
    }
}
Background Reading
Well, that was a lot of work to read a single URI and some text! Luckily there’s an easier way to read certain types of payloads on an NFC Tag. iPhone X and later, supports a feature called Background Reading which allows for automatically detecting and reading NFC tags that contain payloads of type URI without the need of an app.
When a tag with a URI is detected, iOS will show a notification and when users tap on it, it will try to open the adequate app for it.
For this example I’m storing a Spotify URI so when I approach my tag to an iPhone X, I see a notification popping up and tapping the notification causes the Spotify app to open and play the song because Spotify supports deep linking for the particular URI I’m sending. In general this is possible because iOS processes NDEF payloads containing a URI in the same way as universal links.
If you want your app to support this behavior similar to how the Spotify app does, follow the next steps.
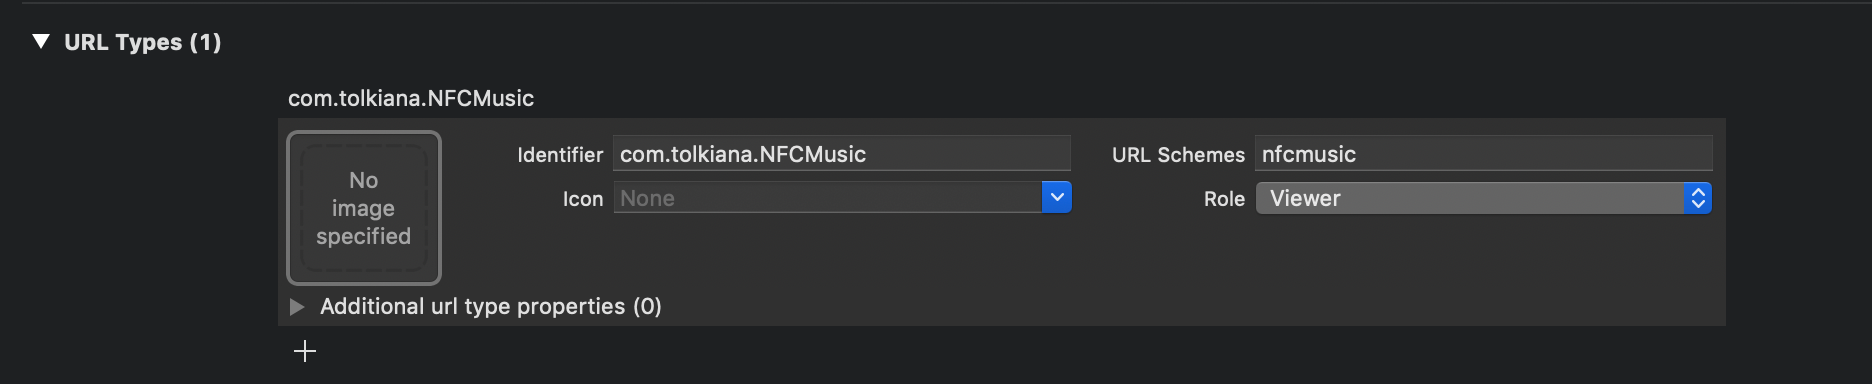
1. Define your App Scheme 📱
Your App Scheme should be compatible with iOS URL Schemes so make sure you follow the rules described in this document, generally your scheme should look something like this:
scheme://resource
For this example a URI would like this:
nfcmusic://play:all
Where the first part (nfcmusic) is the scheme name, which also matches the name of the app, and the other two (play and all) are parameters of the scheme and refer to options in my app.
2. Write a tag with your App’s URI 📝
Now that you know your scheme, you can write your tag with a URI that follows your particular app scheme (follow the steps from Writing NDEF Tags section for more details on how to write tags).
let uriPayload = NFCNDEFPayload.wellKnownTypeURIPayload(string: "nfcmusic:play:all")
let myMessage = NFCNDEFMessage(records: [uriPayload])
3. Register your URL Scheme 🔗
If all you want to see the notification for your app every time you approach the tag, all you need to do is to register your URL scheme on your target settings.
If you want your app do something specific depending on the URI you will have to implement deep linking on your app so it does different things depending on the parameters on the URI.
Conclusion
There’s a lot to learn about NFC, and I hope to write more about this exciting technology in the future , specifically about reading and writing tags with Native Protocols. For now I hope you found this information useful. You can find the full example in my Github repo.
Resources
Adding Support for Background Tag Reading
Applications and Future of NFC
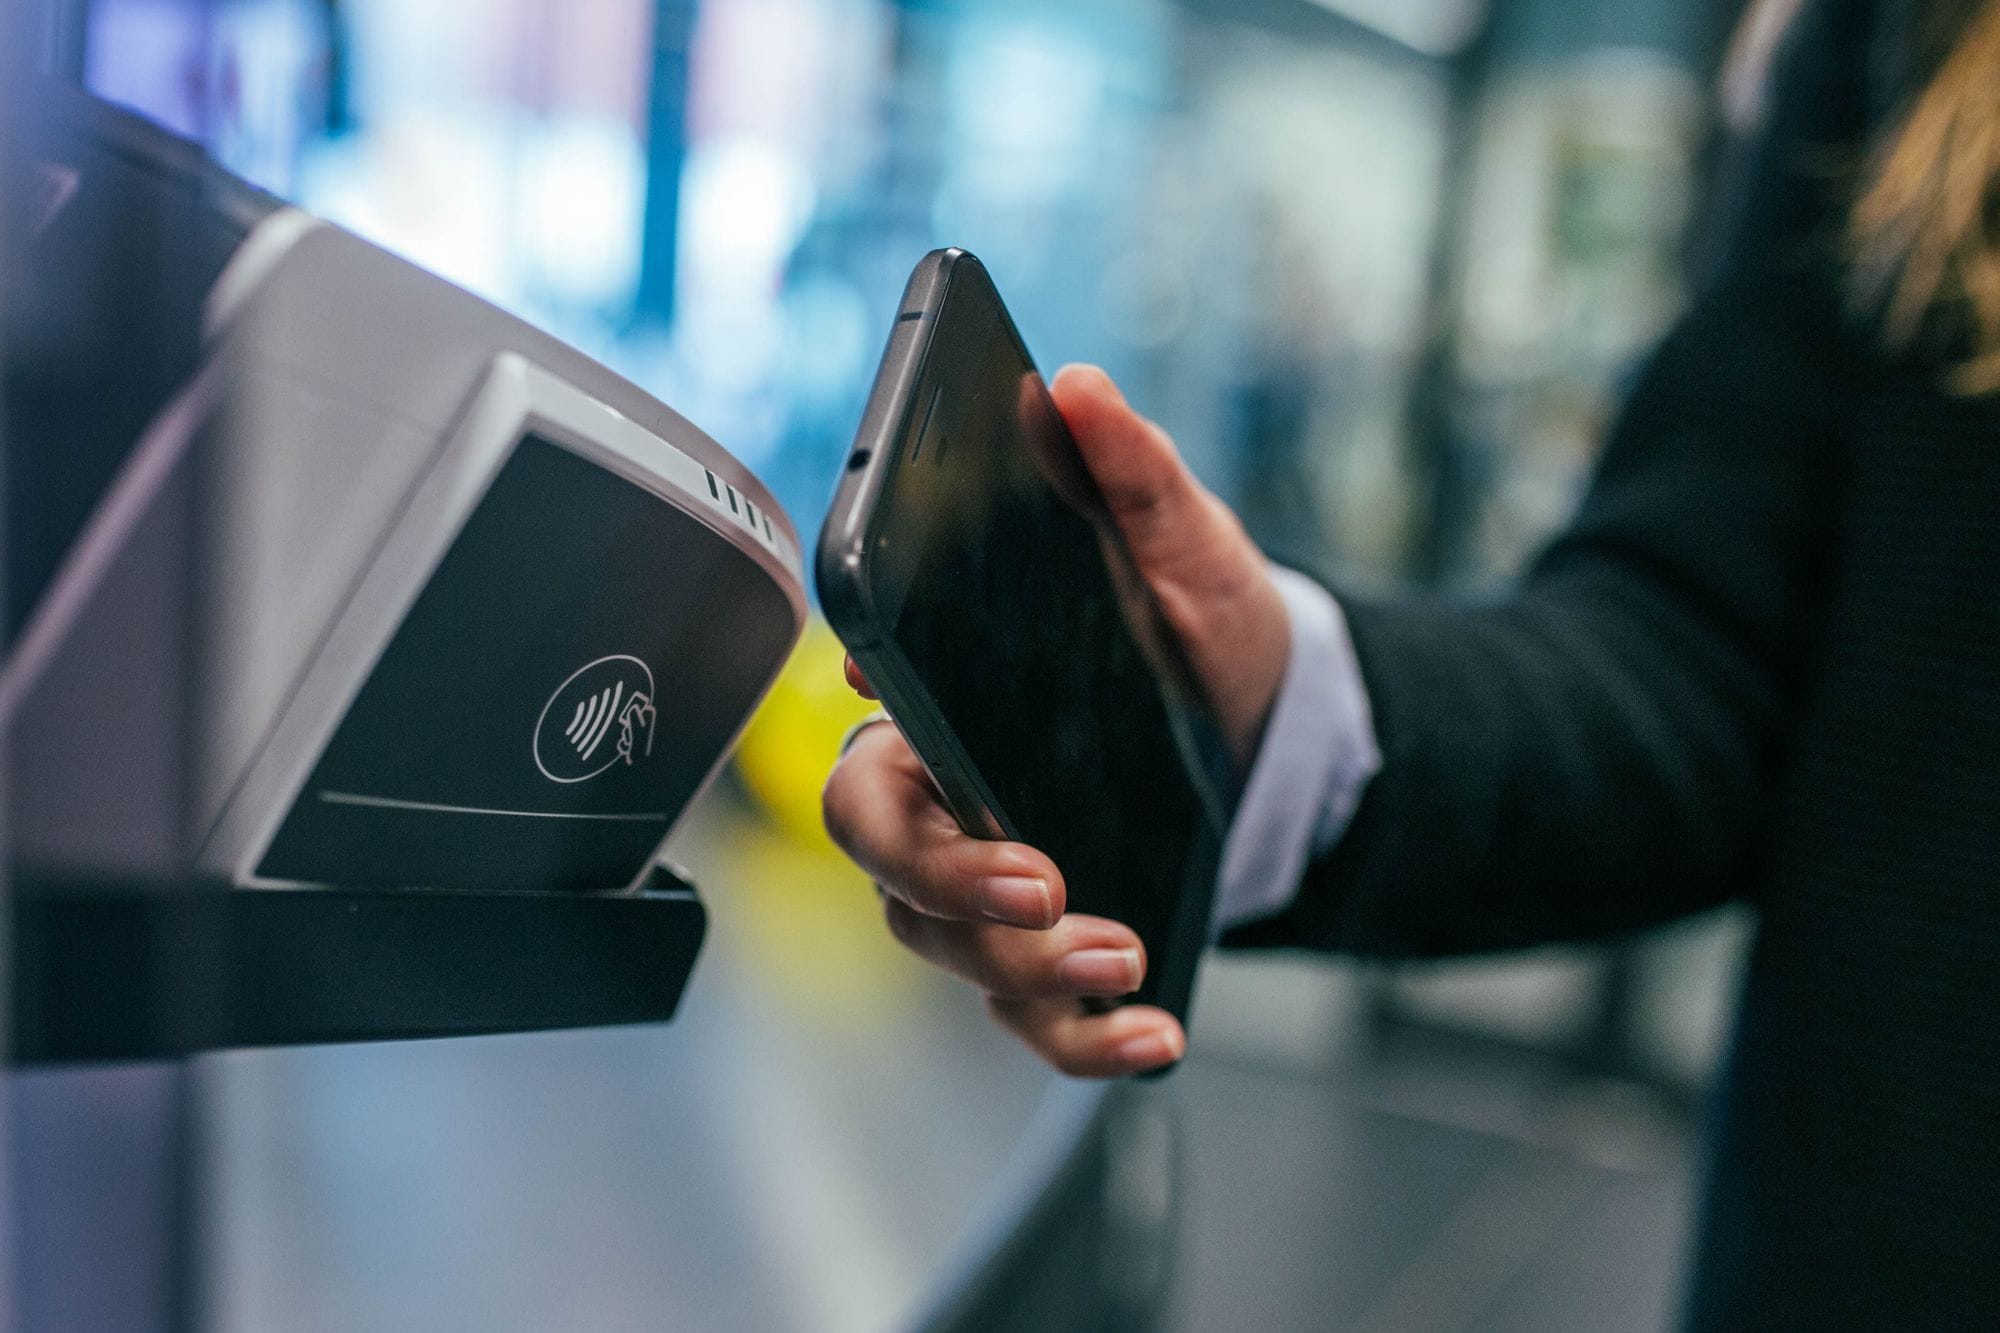
Photo by Jonas Leupe on Unsplash